George and I have some news to share with you: we are going to be parents in 2012! (Now you know why I didn't go skiing/snowboarding a few weeks ago. :-)) I am currently about 13 weeks pregnant, and our baby is due to be born in late June. Given the history of late births in both families, I fully expect to still be pregnant when we celebrate America's birthday.
The pregnancy has gone pretty smoothly so far. We will be finding out the gender, but not until January 30th, assuming that our squirming baby moves into a position that allows us to see the goods at that time. It's going to be an exciting journey to watch him/her develop and grow over the next six months or so. After that, the real journey will begin!
Because I can't help myself, I'm going to share our most recent ultrasound photo. Just as the baby is going to be a part of our lives, it'll be part of the blog. However, I am going to do my best to minimize the baby coverage as George and I will continue to have other interests as well. Welcome to this new chapter of our lives!
23 December 2011
14 December 2011
'Tis the Season
Today was a perfect day for this season. I started my morning with this creamy hot chocolate.
It kept me company while I listened to Christmas music on Pandora and worked on Christmas cards.
At the end of the day, I (finally) made a Christmas ornament from one of our leftover wedding invitations, inspired by Misha. Check out her blog for the full tutorial.
05 December 2011
Joy to the World
Yesterday, George headed up the mountain while I opted to stay home and get crafty. I got inspiration from, first, an HGTV show where the host painted the words "Joy to the World" on a big wall map and, second, from a display that I saw at TJ Maxx made out of recycled magazine. For less than $20, I brought a little joy into our house, and I'm pretty happy with the final product.
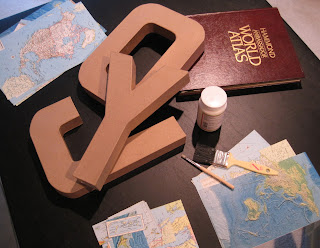
I started with 12" paper mache letters, paper Mod Podge in gloss finish (used about a half container), an atlas from 1987 that I picked up for $1.00 at an estate sale, and a clean old paintbrush.
I cut out a bunch of maps from the atlas that had places of interest and interesting, colorful borders. (Although I didn't, I would recommend putting down some clear plastic or paper before starting because the Mod Podge is really difficult to clean up, though technically cleanable with soap and water.) Using the brush, I applied a thin coat of Mod Podge to the whole back of each piece before placing it on the letters. I ended up cutting almost all of the maps into much smaller pieces. It looked best to start with the corners of the letters and then fill in the flatter parts later so that the maps in the flat part would cover some of the corner patches. (I didn't take any mid-project pictures because my fingers were covered in Mod Podge.)
Once all of the letters were covered, they dried in front of the dehumidifier for about 2 to 3 hours. Then, I applied three coats of Mod Podge over the top for a glossy finish, letting the letters dry for approximately 20-30 minutes between each coat.
This is the final product:
And here is our Joy to the World as part of our holiday display:
I'm really pleased about how the different colors around the borders come out with the purple and turquoise bulbs. I'm also thinking about how many ways this project can be adapted.
Subscribe to:
Posts (Atom)


