31 May 2013

Memorial Day Weekend in Oregon

Memorial Day weekend is one of the two major wine tasting weekends in Willamette Valley (Oregon). We were originally hesitant to go this year, but we ultimately decided that this is probably the last time we're going to get a weekend of wine tasting for a while (several years) because Madeleine is quickly getting too active to be patient while we sip our favorite varietals and compare accompanying cheeses.

We started Saturday* (after a morning nap on the road) with a visit to Soter, which is one of our favorites in the Valley. We served their sparkling wine at our wedding and loved the tasting we did a few years ago. They hosted a nice open house in which they poured their current releases and served complimentary nibbles. I love their location and think it's one of the most beautiful in the Valley. Of course, the littlest member of our party was a big hit.


We tasted at a few other (new to us) places in Carlton and enjoyed returning to the local bistro for lunch. Between wineries and lunch and more wineries, we stopped for a swing in the local park. If this isn't the face of pure joy, I don't know what is! (This may also answer your questions about the quantity of hair on her head. There are approximately 30 hairs, but they are getting longer!)


That night, Madeleine had the quintessential Portland experience: dinner at a food cart.


On Sunday, we enjoyed three fantastic meals at three of our favorite Oregon restaurants: Mothers, Bistro Maison, and Piazza Italia. The wild mushroom and goat cheese tart from Bistro Maison goes on my short list of best flavored foods - so delicious that I won't soon forget it.

Amongst all that delicious food, we (and our friends) visited three McMinnville wineries. The first was our favorite Willamette winery (and maybe favorite favorite), Eyrie. They were pouring some new releases along with library wines from the 1980s and 1990s - what a treat! We were able to chat with the (second generation) winemaker, Jason, to get some food-pairing recommendations and advice on what wine might make it to Madeleine's 21st. Meanwhile, Madeleine decided to try to access the wine now.


Our other two Sunday wineries were past favorites and current disappointments, Panther Creek and Anne Amie.

Monday morning, we had a semi-disastrous (but still delicious) visit to a pancake restaurant before making the 188 mile drive home. Madeleine was a real trooper with all of the driving. On the way south, we made one stop for a scheduled meal and otherwise just had one episode of Madeleine frantically signing "all done" from the backseat. On the way home, she slept the entire three and a half hour (record time) drive. This was our first roadtrip with Madeleine, and it's good to know that she handles it well.

Don't worry - this was while the car was parked in a safe location.

Overall, it was a good trip and far better than our last vacation. How did you spend your Memorial Day weekend? Where did you take your last roadtrip?


*You may notice that the nice camera only came out on Saturday. Bummer!

29 May 2013

Madeleine - Week 48

What a difference a week makes! Madeleine is showing some definite attitude and opinion in this last week, including launching food off of her tray at meal times. She has been chatting up a storm, including lots of "dog" and variations on "daddy." I'm pretty sure she thinks my name is "no."

Here's a glimpse into this morning:
   Me: Whose banana am I picking up off the floor?
   Madeleine: Daddy!

Despite Madeleine's new toddler tendencies, things are looking a bit brighter as last night we had our first uninterrupted night of sleep in more than two months. (Knock on wood!)


This week's photo features Madeleine's first official pair of shoes. We decided that it was time to protect her feet so that she can practice cruising (and eventually walking) when we're out and about. Doesn't she look grown up in them?!

27 May 2013

Happy Memorial Day!

We're freshly back from a wonderful weekend in Portland; check back on Friday for a full report.

It doesn't feel like the start to summer today (usually doesn't until 4th of July in Seattle), but we still broke out Madeleine's patriotic summer outfit. We also gave her a chair that I picked up at Ikea for use in our backyard. Having seen her play with it for about 10 minutes, I'm guessing it'll be used as a stool more than a chair. Happy 11th month birthday, Miss M!


Happy Memorial Day!

24 May 2013

Custom Crib Railing Covers

Crib railing protectors were on my nursery sewing list before Madeleine was born. As the pregnancy got into its later stages and I became short on both energy and time, they placed back on a Pinterest board and out of my mind. Once the time came to protect Madeleine's crib from her (hopefully soon-to-be) teeth, so I set out to make custom crib rail covers that would allow the crib's shape to live on. 


This is by no means a full tutorial but rather general guidance on how to make custom rail protectors for your little beaver's crib based upon the steps I took. As always, leave questions in the comments if something is unclear to you. 

The first thing you need is a pattern for your covers. Fortunately, my problem-solving husband suggested that I use the toddler bed rail in Madeleine's closet rather than take drastic steps like turning the crib on its side or doing a tag team effort to trace the crib rail in place. Husband FTW. This paper made this part of the project pretty easy. Trace your shape, cut out the pattern, and fold it in half to confirm symmetry. 


After making the pattern and getting measurements, construct your top and bottom for each cover. For me, this involved cutting strips of fabric as wide as the cover and then cutting them such that two pieces would form a top or a bottom and have the seam in the middle. I can see a lot of different possibilities here, such as patchwork, stripes, or different fabrics on the top and bottom. 

{I didn't take a picture of this step, but this is what you see under the pattern in the photos above and below.}

Once your tops and bottoms are created and seams are pressed out, pin the tops to the bottoms facing each other. Carefully trace your pattern with a disappearing pen (I like this one) and very carefully cut out the shape of your covers. You can unpin the tops and bottoms. 


Next, it's time to trace and cut out your pattern on the batting. If you have old textiles laying around, there are probably a bunch of different things you could use as batting (mattress pad, comforter, ironing board cover, etc.). Fusible fleece might work well, too, but I dismissed that idea because I didn't want Miss Madeleine chewing on the adhesive that makes it fusible. I chose to use 1/4-inch batting, and I'm pleased with the result. A giant Sharpie worked well for tracing.


Going back to your tops and bottoms, you want to place your ribbons where you want them and pin them in place. It shouldn't matter if you pin them to the top or bottom, though I'd probably choose the darker of the fabric if that's an option. Pay close attention to the dangly end of the ribbon where the cover gets narrow. 

Ribbon length is a personal preference. Mine are six inches long, and I wish that I would have done something closer to four. You'll want them significantly longer if you plan to tie your ribbons in bows. 


It's time to make your fabric sandwich. First, lay down the top or bottom with the pinned ribbons. The print and ribbons should be facing up. Next, lay down the partnered top or bottom (the one without the ribbons) with its print facing down, toward the ribbons. Finally, lay the batting on top. Make sure everything lines up properly, and pin your sandwich well. I'd recommend pinning far enough from the edges that you can leave the pins in as/after you sew. Do the same for your second cover. 


Head to your machine and sew along the long sides of the covers, back stitching at the ribbons for extra strength. I suggest using the fabric (rather than batting) as your guide and allowing a 1/4- to 1/2-inch seam. 

Make sure you've sewn through all layers, take out your pins, and carefully (there are still pins in there!) turn your covers right side out. Remove the pins holding your ribbons in place. Press your covers. 


This is a good time to do any quilting or top stitching. I sewed a line down the center at this stage and later went back to top stitch the sides, so it can certainly be done later if you change your mind. 

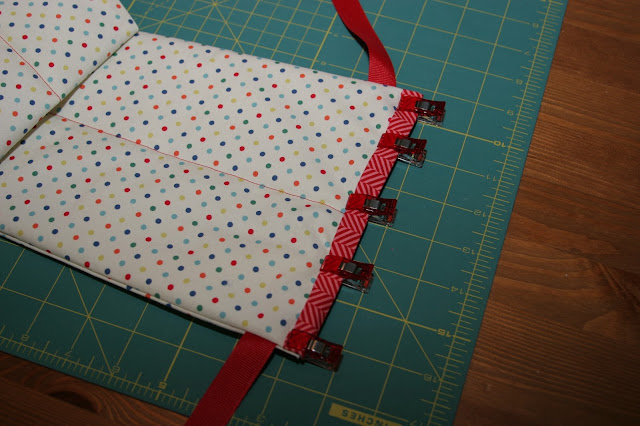
To finish off the ends, you'll want to cut your bias tape to about an inch longer than the ends of your covers. Press the tape so that you have a neat finish on both ends of the tape. Pin (or use the fabulous Clover clips to hold) the tape in place and sew.


Get your ribbons ready for use by trimming them to your desired angle and exposing them to just enough flame to melt and seal the ends. 


A few double knots later, and you're done! 


A bit of a pep talk: This process seems complicated, but it took me almost as long to type this entry as it did to make the covers. If you can sew a relatively straight line, you can make custom crib rail covers for your crib! Happy sewing!

22 May 2013

Madeleine - Week 47

Madeleine continues to progress a little each day and week. I can't believe she'll be 11 months next Monday!

She's doing more cruising rather than always relying on crawling, and she has a remarkable amount of speed going up stairs. She's still hesitant going down the one stair into our family room, so we haven't encouraged her to try going down the big stairs.  

Madeleine has been signing pretty well the last couple of weeks. Vocally, when we repeat a word to her, she is often imitating the intonation with her response. Yesterday, I would swear that she repeated "dog," but we're having a bit of debate on whether it's her first word. Thankfully, it was caught on video, so we can replay it a million times. I'm sure she'll love that at her 21st birthday.

Madeleine is still a great eater; last night she ate a large quantity of gnocchi and bit of fresh mozzarella. 

I'm really pleased with her social development and was in motherhood heaven yesterday when I watched Madeleine and her friends chase each other through a tunnel during a play date. They were really playing with each other! 

I need to measure our tall girl because several of her pants are suddenly too short. Perhaps growing pains (and never ending teething) could be to blame for much (much, much, much) interruption in the sleep department. Unfortunately, Madeleine still doesn't have any pearly whites poking through. 


20 May 2013

Nursery Updates

I mentioned that I was crafting away last week. Aside from one homemade gift, all the projects were bound for Miss M's nursery. What can I say? I had a lot of pent up creativity after spending a week recuperating away from my crafting space.

Before we get into the specifics of my new creations, let's take a look at the evolution of Madeleine's nursery. It was nearly a year ago when I revealed her completed nursery at our old house (see the original post for the source list and more photos).


This nursery served us well during those early months in the trenches of new parenthood, but we moved house when Madeleine was a mere 15 weeks old. The curtains and attached shelves stayed behind for the new owner. The Kiwi alphabet didn't survive its removal from the wall.

Otherwise, the nursery pretty much came with us to our new house. In the new nursery, we had the walls painted Benjamin Moore Seaside Resort, hung some picture ledges for books, and moved in our old nursery. Over the past six months, we also changed out the old blinds for blackout shades (in snow) and changed out the partially painted gold knobs for clears ones on the closet doors. This is more or less how the nursery looked from getting set up until this weekend (you know, on a good day).


There are a few things that sparked my recent surge of projects and updates to the nursery. One, I was annoyed every.single.time I looked at the crib skirt. I'd never loved it, and I loved it even less as I tried to make the longer skirt work after the mattress was lowered to the lowest setting. Two, I knew that crib damage was inevitable if I didn't make some rail protectors before Madeleine sprouted some teeth because she has already shown beaver-like tendencies when left alone in her crib. Finally, I felt the wall with the windows was sparse without curtains, valences, or something.

Armed with some ideas and the estimation that I'd need about four yards of my primary fabric, I spent part of Mother's Day fabric shopping (alone - such a treat!). After ruling out many fabrics for being too kiddo, too trendy, too flashy, or too plain, I found my Goldilocks fabric: this cute polkadot print (Mini Mikes Mini Dot by Michael Miller).


When I came home, I discovered that it's the same fabric manufacturer and same colors as the fabric that inspired the nursery color palette more than a year ago (Michael Miller Lolli Dots).


One week of feverish sewing later, I'm thrilled to show you Miss M's corner of the world now.


I made a new crib skirt to fit the current (and final) mattress position. I had very low hopes for my ability to get it to accurately fit both the length of the crib and height from the floor, but I seem to have succeeded. And I am way too excited about that pretty little pleat.


I removed the rug because I thought it'd be too much with the pattern of the new skirt, but I'm having second thoughts because the floor seems so bare after I'm used to seeing it with the rug. I'm going to give it some time and then reconsider.

Although there are lots of really simple ideas for how to make crib rail protectors, I ended up designing my own because I didn't want to lose the pretty curved detail of the crib by putting something frumpy and rectangle on it. Come back on Friday, and I'll show you how I did it and go into more detail about these little beauties.


I was originally planning to make some simple valences for the windows, but the shades are mounted too far toward the front of the window to attach any sort of curtain rod inside the window. So, my solution for dressing up the windows consists of a $2 craft store letter painted in (spoiler alert) the red that will soon be appearing on our front door and leaving the shades down a bit when they're not in use.


Because I was already working on things for Madeleine's room, I went ahead and made a modified version of the Noodlehead divided basket (yep, I'm obsessed) to store overnight diapers and other bits and bobs. The interior fabric, binding, and red finishing stitching on the basket may be my favorite details in the room.


To coordinate with the other fabric items in the room, I made a handy, dandy trash bag holder for old grocery bags (from this tutorial). This thing is huge. While I wish that I would have followed my gut and made it smaller than the tutorial suggested, I'm pretty sure that we won't need to refill it until Madeleine's going to school. 


To top it off, Madeleine also got a new shelf, a new set of hooks behind the door, and some cable management for her webcam cord. 

Yep, that's yours truly with my grandma. 


My favorite items, by function, are the chair and the webcam. That said, the details and the occupant are the parts of the room that really make me smile.


I hesitate to say that Madeleine's room is "done" because I know it'll continue to evolve, especially little things like the trinkets on her shelf. That said, I have high hopes that the fabric creations I made last week will serve her well through the rest of infancy and toddlerhood.

And now you can go rest your eyes after making it through 498,573 photos. Happy Monday, world.

17 May 2013

Spring Garden Tour

Each season of the first year in a new house brings surprises in the garden department. So far, we have been pleasantly surprised - especially this spring. We wonder why the previous owners didn't list this house for sale in spring, but maybe there are even better surprises waiting for us in August...? 

Anyway, I thought I'd show you some of what is blooming at the moment. 

The backyard is dripping with the scent of lilac at the moment.

We have a bunch of rhodies, this one blooming in both white and pink.

More rhodies...

And lots of azaleas...

I'm not sure what this is, but I love the cute little pink flowers and bright green leaves.

It's hard to beat new growth green, the color that inspired our wedding colors.

When we left for Arizona, these trees didn't have leaves, and now they're full of birds and green.

In case it's not already obvious, let me tell you that we love (love, love, love, love) our yard. At every opportunity, we try to get out and enjoy it. The quiet. The green. The sound of birds. The occasional "clip clop" of a horse. The squeal of our baby crawling through the grass being "chased" by her daddy. 


So, what's popping up in your garden this spring? If you've moved, are you getting good or bad surprises as you live the first year of seasons in your new abode?